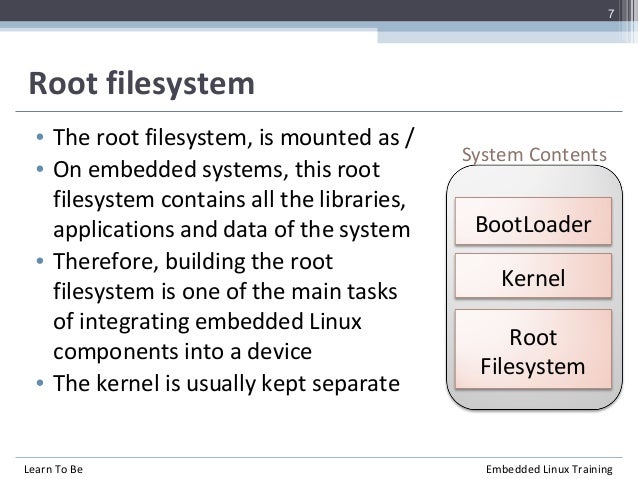
Building a Root Filesystem
The root filesystem is the
fourth and the final element of embedded Linux. Once you have read this , you
will be able build, boot, and run a simple embedded Linux system.
The techniques I will
describe here are broadly known as roll
your own or RYO. Back in the
earlier days of embedded Linux, this was the only way to create a root filesystem. There are still some use cases where an
RYO root filesystem is applicable, for example, when the amount of RAM or
storage is very limited, for quick demonstrations, or for any case in which
your requirements are not (easily) covered by the standard build system tools.
Nevertheless, these cases are quite rare. Let me emphasize that the purpose of
this is educational; it is not meant to
be a recipe for building everyday embedded systems: use the tools described in
the next for this.
The first objective is to
create a minimal root filesystem that will give us a shell prompt. Then, using
this as a base, we will add scripts to start up other programs and configure a
network interface and user permissions. There are worked examples for both the
BeagleBone Black and QEMU targets. Knowing how to build the root filesystem
from scratch is a useful skill, and it will help you to understand what is
going on when we look at more complex examples in later s.
In this , we will cover the following topics:
What should be in the root filesystem?
Transferring the root filesystem to the target.
Creating a boot initramfs.
The init program.
Configuring user accounts.
A better way of managing device nodes.
Configuring the network.
Creating filesystem images with device tables.
Mounting the root filesystem using NFS.
What should be in the root filesystem?
The kernel will get a root
filesystem, either an initramfs,
passed as a pointer from the bootloader, or by mounting the block device given
on the kernel command line by the root= parameter. Once it has a root filesystem, the
kernel will execute the first program, by default named init, as described in
the section Early user space in 4, Configuring and Building the Kernel. Then, as far as the kernel is concerned, its job is complete. It
is up to the init program to begin starting other programs and so bring the
system to life.
To make a minimal root filesystem, you need these components:
init: This is the program that
starts everything off, usually by running a
series of
scripts. I will describe how init works in much more detail in Chapte r 10, Starting Up – The init Program
Shell: You need a shell to give
you a command prompt but, more importantly,
also to run the shell scripts called by init and other programs. Daemons: A daemon is a background
program that provides a service to others.
Good examples are the system log daemon
(syslogd) and the secure shell daemon (sshd). The init program must start the
initial population of daemons to
support the main system applications. In fact, init is itself a daemon: it is
the daemon that provides the service of launching other daemons.
Shared libraries: Most programs are linked with shared libraries, and so they must be present in the root
filesystem.
Configuration
files:
The configuration for init and other daemons is stored in a series of text files, usually in the /etc directory.
Device
nodes:
These are the special files that give access to various device drivers.
/proc and /sys: These two pseudo
filesystems represent kernel data structures as a hierarchy of directories and files. Many
programs and library functions depend on proc and sys.
Kernel
modules: If you have
configured some parts of your kernel to be
/lib/modules/[kernel version].
In addition, there are the
device-specific applications that make the device do the job it is intended
for, and also the run-time data files that they generate.
In some cases, you could condense most of these components into a
single, statically-linked program, and start the program instead of init. For
example, if your program was named /myprog, you would add the following command to the kernel command line: init=/myprog. I have come across such a
configuration only once, in a secure system in which the fork system call had been disabled, thus
making it impossible for any other program to be started. The downside of this
approach is that you can't make use of the many tools that normally go into an
embedded system; you have to do everything yourself.

The directory layout
Interestingly, the Linux
kernel does not care about the layout of files and directories beyond the
existence of the program named by init= or rdinit=, so you are free to put things wherever you
like. As an example, compare the file layout of a device running Android to
that of a desktop Linux distribution: they are almost completely different.
However, many
programs expect certain files to be in certain places, and it helps us developers
if devices use a similar layout, Android aside. The basic layout of a Linux
system is defined in the Filesystem
Hierarchy Standard (FHS), which
is available at
http://refspecs.linuxfoundation.org/fhs.shtml. The FHS covers all the implementations of Linux operating systems from the largest to the smallest. Embedded
devices tend to use a subset based on their needs, but it usually includes the
following:
/bin: Programs essential for all users
/dev: Device nodes and other special files
/etc: System configuration files
/lib: Essential shared
libraries, for example, those that make up the C-library
/proc: The proc filesystem
/sbin: Programs essential to the system administrator
/sys: The sysfs filesystem
/tmp: A place to put temporary or volatile files
/usr: Additional programs,
libraries, and system administrator utilities, in the directories /usr/bin, /usr/lib and /usr/sbin, respectively
/var: A hierarchy of files and directories
that may be modified at runtime, for
example, log messages, some of which must be retained after boot
There are some subtle
distinctions here. The difference between /bin and /sbin is simply that the latter need not be included
in the search path for non-root users. Users of Red Hat-derived distributions
will be familiar with this. The significance of /usr is that it maybe in a separate partition from
the root filesystem, so it cannot contain anything that is needed to boot the
system up.
The staging directory
You should
begin by creating a staging
directory on your host computer where you can assemble the files that will
eventually be transferred to the target. In the following examples, I have used
~/rootfs. You need to create a skeleton directory structure in it, for
example, take a look here:
$ mkdir
~/rootfs
$ cd
~/rootfs
$ mkdir
bin dev etc home lib proc sbin sys tmp usr var
$ mkdir
usr/bin usr/lib usr/sbin
$ mkdir -p
var/log
To see the directory
hierarchy more clearly, you can use the handy tree command used in the following example with the -d option to show only the
directories:
$ tree -d
.
├── bin ├── dev ├── etc ├──
home ├── lib ├── proc ├── sbin ├── sys ├── tmp ├── usr
│ ├── bin │ ├── lib │ └──
sbin ├── va
└── var └── log
POSIX file access
permissions
Every process, which in the
context of this discussion means every running program, belongs to a user and
one or more groups. The user is represented by a 32-bit number called the user ID or UID. Information about users, including the mapping from a UID to a
name, is kept in /etc/passwd. Likewise, groups are
represented by a group ID or GID with information kept in /etc/group. There is always a root user with a UID of 0 and a root group with a
GID of 0. The root user is also called the superuser because; in a default
configuration, it bypasses most permission checks and can access all the
resources in the system. Security in Linux-based systems is mainly about
restricting access to the root
account.
Each file and directory
also has an owner and belongs to exactly one group. The level of access a
process has to a file or directory is controlled by a set of access permission
flags, called the mode of the file.
There are three collections of three bits: the first collection applies to the owner of the file, the second to the members of the same group as the file,
and the last to everyone else: the
rest of the world. The bits are for read (r), write (w), and execute (x) permissions
on the file. Since three bits fit neatly into an octal digit, they are usually
represented in octal, as shown in the following diagram:


There is a further group of three bits that have special meanings:
SUID (4): If the file is executable, it changes the effective UID of the process to that of the owner of the
file when the program is run.
SGID (2): Similar to SUID, this
changes the effective GID of the process to
that of the group of the file.
Sticky (1): In a directory, this restricts deletion so that one user cannot delete files that are owned by another
user. This is usually set on /tmp
and
The SUID bit is probably
used most often . It gives non-root users a temporary privilege escalation to
superuser to perform a task. A good example is the ping program: ping opens a raw socket, which
is a privileged operation. In order for normal users to use ping, it is owned by user root and has the SUID bit set
so that when you run ping,
it executes with UID 0
regardless of your UID.
To set these bits, use the
octal numbers, 4, 2, and 1 with the chmod command. For example, to set SUID on /bin/ping in your staging root directory, you could use the
following:
$ cd
~/rootfs
$ ls -l
bin/ping
-rwxr-xr-x 1 root root
35712 Feb 6 09:15 bin/ping
$ sudo
chmod 4755 bin/ping
$ ls -l
bin/ping
-rwsr-xr-x 1 root root
35712 Feb 6 09:15 bin/ping
Note that the second ls command shows the first
three bits of the mode to be rws,
whereas previously, they had been rwx. That 's' indicates that the SUID bit is set.
File ownership permissions in the staging directory
For security and stability
reasons, it is vitally important to pay attention to the ownership and permissions
of the files that will be placed on the target device. Generally speaking, you
want to restrict sensitive resources to be accessible only by the root and
wherever possible, to run programs using non-root users so that if they are
compromised by an outside attack, they offer as few system resources to the
attacker as possible. For example, the device node called /dev/mem gives access to system
memory, which is necessary in some programs. But, if it is readable and
writeable by everyone, then there is no security because everyone can access
everything in memory. So, /dev/mem
should be owned by root, belong to the root group, and have a mode of 600,
which denies read and write access to all but the owner.
There is a problem with the
staging directory though. The files you create there will be owned by you, but
when they are installed on the device, they should belong to specific owners
and groups, mostly the root
user. An obvious fix is to change the ownership to root at this stage with the
commands shown here:
$ cd
~/rootfs
$ sudo
chown -R root:root *
The problem is that you
need root privileges to run the chown command, and from that
point onward, you will need to be root to modify any files in the staging directory.
Before you know it, you are doing all your development logged on as root, which is not a good idea.
This is a problem that we will come back to later.
Programs for the root
filesystem
Now, it is time to start
populating the root filesystem with the
essential programs and the supporting libraries, configuration, and data files
that they need to operate. I will begin with an overview of the types of
programs you will need.
The init program
Init is the first program
to be run, and so it is an essential part of the root filesystem. In this , we
will be using the simple init program provided by BusyBox.
Shell
We need a shell to run
scripts and to give us a command prompt so that we can interact with the
system. An interactive shell is probably not necessary in a production device,
but it is useful for development, debugging, and maintenance. There are various
shells in common use in embedded systems:
bash: This is the big beast
that we all know and love from desktop Linux. It is a superset of the Unix Bourne shell with many extensions or bashisms. ash: Also based on the Bourne shell, it has a long history with the
BSD variants of Unix. BusyBox has a
version of ash, which has been extended
to make it more compatible with bash.
It is much smaller than bash,
and hence it is a very popular choice for embedded systems.
hush: This is a very small
shell that we briefly looked at in 3, All
about Bootloaders. It is useful
on devices with very little memory. There is
a version of hush in BusyBox.
If you are using ash or hush as the shell on the target, make sure that you test your shell scripts
on the target. It is very tempting to test them only on the host, using bash, and then be surprised
that they don't work when you copy them to the target.

Utilities
The shell is just a way of
launching other programs, and a shell script is little more than a list of
programs to run, with some flow control and a means of passing information
between programs. To make a shell useful, you need the utility programs that
the Unix command line is based on. Even for a basic root filesystem, you need
approximately 50 utilities, which presents two problems. Firstly, tracking down
the source code for each one and cross-compiling it would be quite a big job.
Secondly, the resulting collection of programs would take up several tens of
megabytes, which was a real problem in the early days of embedded Linux when a
few megabytes was all you had. To solve this problem, BusyBox was born.
BusyBox to the rescue!
The genesis of BusyBox had nothing to do with embedded
Linux. The project was instigated in 1996 by Bruce Perens for the Debian
installer so that he could boot Linux from a 1.44 MB floppy disk.
Coincidentally, this was about the size of the storage on contemporary devices,
and so the embedded Linux community quickly took it up. BusyBox has been at the
heart of embedded Linux ever since.
BusyBox was written from
scratch to perform the essential functions of those essential Linux utilities.
The developers took advantage of the 80:20 rule: the most useful 80% of a
program is implemented in 20% of the code. Hence, BusyBox tools implement a
subset of the functions of the desktop equivalents, but they do enough of it to
be useful in the majority of cases.
Another trick BusyBox
employs is to combine all the tools together into a single binary, making it
easy to share code between them. It works like this: BusyBox is a collection of
applets, each of which exports its main function in the form [applet]_main. For example, the cat command is implemented in coreutils/cat.c and exports cat_main. The main function of BusyBox itself
dispatches the call to the correct applet, based on the command-line arguments.
So, to read a file, you can
launch BusyBox with the name of the applet you want to run, followed by any
arguments the applet expects, as shown here:
$
busybox cat my_file.txt
You can also run BusyBox
with no arguments to get a list of all the applets that have been compiled.
Using BusyBox in this way
is rather clumsy. A better way to get BusyBox to run the cat applet is to create a
symbolic link from /bin/cat to /bin/busybox:
$ ls -l
bin/cat bin/busybox
-rwxr-xr-x 1 root root 892868 Feb 2 11:01
bin/busybox
lrwxrwxrwx 1
root root 7 Feb 2 11:01 bin/cat -> busybox
When you type cat at the command line, BusyBox is the program
that actually
runs. BusyBox only has to
check the command tail passed in argv[0], which will be /bin/cat, extract the application name, cat, and do a table look-up to
match cat with cat_main. All this is in libbb/appletlib.c in this section of code
(slightly simplified):
applet_name = argv[0];
applet_name = bb_basename(applet_name);
run_applet_and_exit(applet_name, argv);
BusyBox has over three
hundred applets including an init program, several shells of varying levels of
complexity, and utilities for most admin tasks. There is even a simple version
of the vi editor, so you can change
text files on your device.
To summarize, a
typical installation of BusyBox consists of a single program with a symbolic
link for each applet, but which behaves exactly as if it were a collection of
individual applications.
Building BusyBox
BusyBox uses the same Kconfig and Kbuild system as the kernel, so
cross compiling is straightforward. You can get the source by cloning the Git
archive and checking out the version you want (1_26_2 was the latest at the time of writing), such as
follows:
$ git
clone git://busybox.net/busybox.git
$ cd
busybox
$ git
checkout 1_26_2
Then, configure BusyBox by
starting with the default configuration, which enables pretty much all of the
features of BusyBox:
$ make
distclean
$ make
defconfig
At this point, you probably
want to run make
menuconfig
to fine tune the configuration. For example, you almost certainly want to set
the install path in Busybox Settings | Installation Options (CONFIG_PREFIX) to point to the staging
directory. Then, you can cross compile in the usual way. If your intended
target is the BeagleBone Black, use this command:
$ make
ARCH=arm CROSS_COMPILE=arm-cortex_a8-linux-gnueabihf-
If your intended target is
the QEMU emulation of a Versatile PB, use this command:
$ make
ARCH=arm CROSS_COMPILE=arm-unknown-linux-gnueabi-
In either case, the result is the executable, busybox. For a default
configuration build like this, the size is about 900 KiB. If this is too big
for you, you can slim it down by changing the configuration to leave out the
utilities you don't need.
To install BusyBox into the staging area, use the following command:
$ make
ARCH=arm CROSS_COMPILE=arm-cortex_a8-linux-gnueabihf- install
ToyBox – an alternative to
BusyBox
BusyBox is not the only game in town. In
addition, there is ToyBox, which you
can find at http://landley.net/toybox/. The project was started by Rob Landley, who
was previously a maintainer of BusyBox. ToyBox has the same aim as BusyBox, but
with more emphasis on complying with standards, especially POSIX-2008 and LSB
4.1, and less on compatibility with GNU extensions to those standards. ToyBox
is smaller than BusyBox, partly because it implements fewer applets. However,
the main difference is the license, which is BSD rather than GPL v2. This makes
it license compatible with operating systems with a BSD-licensed user space,
such as Android, and hence it is part of all the new Android devices.
Libraries for the root
filesystem
Programs are linked with
libraries. You could link them all statically, in which case, there would be no
libraries on the target device. But, this takes up an unnecessarily large
amount of storage if you have more than two or three programs. So, you need to
copy shared libraries from the toolchain to the staging directory. How do you
know which libraries?
One option is to copy all
of the .so files from the sysroot directory of your
toolchain, since they must be of some use otherwise they wouldn't exist! This
is certainly logical and, if you are creating a platform to be used by others
for a range of applications, it would be the correct approach. Be aware,
though, that a full glibc
is quite large. In the case of a crosstool-NG build of glibc 2.22, the libraries,
locales, and other supporting files come to 33 MiB. Of course, you could cut
down on that considerably using musl libc
or uClibc-ng.
Another option is to cherry
pick only those libraries that you require, for which you need a means of
discovering library dependencies. Using some of our knowledge from 2, Learning
About Toolchains, we can use the readelf command for this task:
$ cd ~/rootfs
$ arm-cortex_a8-linux-gnueabihf-readelf -a bin/busybox | grep
"program interpreter" [Requesting program interpreter:
/lib/ld-linux-armhf.so.3]
$ arm-cortex_a8-linux-gnueabihf-readelf -a bin/busybox | grep "Shared
library" 0x00000001
(NEEDED) Shared library: [libm.so.6]
0x00000001 (NEEDED) Shared library: [libc.so.6]
Now, you need to find these
files in the toolchain sysroot
directory and copy them to the staging directory. Remember that you can find sysroot like this:
$ arm-cortex_a8-linux-gnueabihf-gcc -print-sysroot /home/chris/x-tools/arm-cortex_a8-linux-gnueabihf/arm-cortex_a8-linux-gnueabihf/sysroot
To reduce the amount of
typing, I am going to keep a copy of that in a shell variable:
$ export
SYSROOT=$(arm-cortex_a8-linux-gnueabihf-gcc -print-sysroot)
If
you look at /lib/ld-linux-armhf.so.3 in sysroot, you will see that, it is,
in fact, a symbolic link:
$ cd
$SYSROOT
$ ls -l
lib/ld-linux-armhf.so.3
lrwxrwxrwx 1 chris chris 10
Mar 3 15:22 lib/ld-linux-armhf.so.3 -> ld-2.22.so
Repeat the exercise for libc.so.6 and libm.so.6, and you will end up with
a list of three files and three symbolic links. Now, you can copy each one
using cp -a, which will preserve the
symbolic link:
$ cd
~/rootfs
$ cp -a
$SYSROOT/lib/ld-linux-armhf.so.3 lib
$ cp -a
$SYSROOT/lib/ld-2.22.so lib
$ cp -a
$SYSROOT/lib/libc.so.6 lib
$ cp -a
$SYSROOT/lib/libc-2.22.so lib
$ cp -a
$SYSROOT/lib/libm.so.6 lib
$ cp -a
$SYSROOT/lib/libm-2.22.so lib
Repeat this procedure for each program.
It is only worth doing this to get the very smallest embedded footprint
possible. There is a danger that you will miss libraries that are loaded
through dlopen(3) calls–plugins mostly. We will look at an example with the name service switch (NSS) libraries when we come to
configure network interfaces later on in this .

Reducing the size by
stripping
Libraries and programs are
often compiled with some information stored in symbol tables to aid debugging
and tracing. You seldom need these in a production system. A quick and easy way
to save space is to strip the binaries of symbol tables. This example shows libc before stripping:
$ file
rootfs/lib/libc-2.22.so
lib/libc-2.22.so: ELF 32-bit LSB shared object,
ARM, EABI5 version 1 (GNU/Linux), dynam
$ ls -og
rootfs/lib/libc-2.22.so
-rwxr-xr-x 1 1542572 Mar 3 15:22
rootfs/lib/libc-2.22.so
Now, let's see the result of stripping debug information:
$ arm-cortex_a8-linux-gnueabihf-strip
rootfs/lib/libc-2.22.so
$ file
rootfs/lib/libc-2.22.so
rootfs/lib/libc-2.22.so:
ELF 32-bit LSB shared object, ARM, EABI5 version 1 (GNU/Linux)
$ ls -og
rootfs/lib/libc-2.22.so
-rwxr-xr-x 1 1218200 Mar 22 19:57
rootfs/lib/libc-2.22.so
In this case, we saved
324,372 bytes, or about 20% of the size of the file before stripping.
Be careful about stripping kernel modules. Some symbols are required by
the module loader to relocate the module code, and so the module will fail to
load if they are stripped out. Use this command to remove debug symbols while
keeping those used for relocation: strip
--strip-unneeded <module name>.

Device nodes
Most devices in Linux are represented by device
nodes, in accordance with the Unix philosophy that everything is a file (except network interfaces, which are
sockets). A device node may refer to a block device or a character device.
Block devices are mass storage devices, such as SD cards or hard drives. A
character device is pretty much anything else, once again with the exception of
network interfaces. The conventional location for device nodes is the directory
called /dev. For example, a serial
port maybe represented by the device node called
/dev/ttyS0.
Device nodes are created using the program named mknod (short for make node):
mknod <name> <type> <major>
<minor>
The parameters to mknod are as follows:
name is the name of the device node that you want to create.
type is either c for character devices or b for a block.
major and minor are a pair of numbers,
which are used by the kernel to route file requests to the appropriate device driver
code. There is a list of standard major and minor numbers in the kernel source
in the file
Documentation/devices.txt.
You will need to create
device nodes for all the devices you want to access on your system. You can do
so manually using the mknod
command, as I will illustrate here; or you can create them automatically at
runtime using one of the device managers that I will mention later.
In a really minimal root
filesystem, you need just two nodes to boot with BusyBox: console and null. The console only needs to
be accessible to root, the owner of the device
node, so the access permissions are 600. The null device should be readable and
writable by everyone, so the mode is 666. You can use the -m option for mknod to set the mode when creating the node. You need
to be root to create device nodes, as
shown here:
$ cd
~/rootfs
$ sudo
mknod -m 600 dev/console c 5 1
$ ls -l dev total 0
crw------- 1 root root 5, 1
Mar 22 20:01 console crw-rw-rw- 1 root root 1, 3 Mar 22 20:01 null
You can delete device nodes
using the standard rm command: there is no rmnod command because, once
created, they are just files.
The proc and sysfs
filesystems
proc and sysfs are two pseudo filesystems
that give a window onto the inner workings of the kernel. They both represent
kernel data as files in a hierarchy of directories: when you read one of the
files, the contents you see do not come from disk storage; it has been
formatted on-the-fly by a function in the kernel. Some files are also writable,
meaning that a kernel function is called with the new data you have written
and, if it is of the correct format and you have sufficient permissions, it
will modify the value stored in the kernel's memory. In other words, proc and sysfs provide another way to
interact with device drivers and other kernel code. The proc and sysfs filesystems should be
mounted on the directories called /proc and /sys:
# mount -t
proc proc /proc
# mount -t
sysfs sysfs /sys
Although they are very
similar in concept, they perform different functions. proc has been part of Linux
since the early days. Its original purpose was to expose information about
processes to user space, hence the name. To this end, there is a directory for
each process named /proc/<PID>, which contains information
about its state. The process list command, ps, reads these files to generate its output. In
addition, there are files that give information about other parts of the
kernel, for example, /proc/cpuinfo tells you about the CPU, /proc/interrupts has information about interrupts, and so on.
Finally, in /proc/sys, there are files that
display and control the state and behavior of kernel subsystems, especially
scheduling, memory management, and networking. The manual page is the best
reference for the files you will find in the proc directory, which you can see by typing man 5 proc.
On the other hand, the role
of sysfs is to present the kernel driver model to user space. It exports a
hierarchy of files relating to devices and device drivers and the way they are
connected to each other. I will go into more detail on the Linux driver model
when I describe the interaction with device drivers in 9, Interfacing
with Device Drivers.
Mounting filesystems
The mount command allows us to
attach one filesystem to a directory within another, forming a hierarchy of
filesystems. The one at the top, which was mounted by the kernel when it
booted, is called the root filesystem.
The format of the mount command is as follows:
mount [-t vfstype] [-o options] device directory
You need to specify the
type of the filesystem, vfstype,
the block device node it resides on, and
the directory you want to mount it to.
There are various options you can give after-o; have a look at the manual page mount(8) for more information. As an
example, if you want to mount an SD card containing an ext4 filesystem in the first
partition onto the directory called /mnt, you would type the following code:
# mount
-t ext4 /dev/mmcblk0p1 /mnt
Assuming the
mount succeeds, you would be able to see the files stored on the SD card in the
directory: /mnt. In some cases, you can
leave out the filesystem type, and let the kernel probe the device to find out
what is stored there.
Looking at the example of
mounting the proc filesystem, there is
something odd: there is no device node, such as /dev/proc, since it is a pseudo filesystem and not a real
one. But the mount command requires a device parameter. Consequently,
we have to give a string where device
should go, but it does not matter much what that string is. These two commands
achieve exactly the same result:
# mount -t
proc procfs /proc
# mount -t
proc nodevice /proc
The strings
"procfs" and "nodevice" are ignored by the mount command. It is fairly
common to use the filesystem type in the place of the device when mounting
pseudo filesystems.
Kernel modules
If you have kernel modules,
they need to be installed into the root filesystem, using the kernel make
target modules_install, as we saw in the last .
This will copy them into the directory called /lib/modules/<kernel version> together with the
configuration files needed by the modprobe command.
Be aware that you have just
created a dependency between the kernel and the root filesystem. If you update
one, you will have to update the other.
Transferring the root filesystem to the target
After having
created a skeleton root filesystem in your staging directory, the next task is
to transfer it to the target. In the sections that follow, I will describe
three possibilities:
initramfs: Also known as a ramdisk,
this is a filesystem image that is loaded
into RAM by the bootloader. Ramdisks are easy to create and have no
dependencies on mass storage drivers. They can be used in fallback maintenance
mode when the main root filesystem needs updating. They can even be used as the
main root filesystem in small embedded devices, and they are commonly used as
the early user space in mainstream Linux distributions. Remember that the
contents of the root filesystem are volatile, and any changes you make in the
root filesystem at runtime will be lost when the system next boots. You would
need another storage type to store permanent data such as configuration
parameters.
Disk image: This is a copy of the
root filesystem formatted and ready to be
loaded onto a mass storage device on the target. For example, it could be
an image in the ext4 format ready to be copied
onto an SD card, or it could be in the jffs2 format ready to be loaded into flash memory via
the bootloader. Creating a disk image is probably the most common option. There
is more information about the different types of mass storage in 7, Creating
a Storage Strategy.
Network
filesystem:
The staging directory can be exported to the network via an NFS server and mounted by the target at boot time. This is
often done during the development phase, in preference to repeated cycles of
creating a disk image and reloading it onto the mass storage device, which is
quite a slow process.
I will start with ramdisk,
and use it to illustrate a few refinements to the root filesystem, such as
adding usernames and a device manager to create device nodes automatically.
Then, I will show you how to create a disk image and how to use NFS to mount
the root filesystem over a network.
Creating a boot initramfs
An initial RAM filesystem,
or initramfs, is a compressed cpio archive. cpio is an old Unix archive
format, similar to TAR and ZIP but easier to decode and so requiring less code
in the kernel. You need to configure your kernel with
CONFIG_BLK_DEV_INITRD to
support initramfs.
As it happens, there are
three different ways to create a boot ramdisk: as a standalone cpio archive, as a cpio archive embedded in the
kernel image, and as a device table which the kernel build system processes as
part of the build. The first option gives the most flexibility, because we can
mix and match kernels and ramdisks to our heart's content. However, it means
that you have two files to deal with instead of one, and not all bootloaders
have the facility to load a separate ramdisk. I will show you how to build one
into the kernel later.
Standalone initramfs
The following sequence of
instructions creates the archive, compresses it, and adds a U-Boot header ready
for loading onto the target:
$ cd
~/rootfs
$ find . |
cpio -H newc -ov --owner root:root > ../initramfs.cpio
$ cd ..
$ gzip
initramfs.cpio
$ mkimage
-A arm -O linux -T ramdisk -d initramfs.cpio.gz uRamdisk
Note that we
run cpio with the option: --owner root:root. This is a quick fix for
the file ownership problem mentioned earlier, making everything in the cpio archive have UID and GID
of 0.
The final size of the uRamdisk file is about 2.9 MB with
no kernel modules. Add to that 4.4 MB for the kernel zImage file and 440 KB for
U-Boot, and this gives a total of 7.7 MB of storage needed to boot this board.
We are a little way off the 1.44 MB floppy that started it all off. If size was
a real problem, you could use one of these options:
Make the kernel smaller by leaving out drivers
and functions you don't need
Make BusyBox smaller by leaving out utilities
you don't need
Use musl libc or uClibc-ng in place of glibc
Compile BusyBox statically
Booting the initramfs
The simplest thing we can
do is to run a shell on the console so that we can interact with the target. We
can do that by adding rdinit=/bin/sh to the kernel command line. The next two sections show how to do that
for both QEMU and the BeagleBone Black.
Booting with QEMU
QEMU has the option called -initrd to load initramfs into memory. You should
already have from 4, Configuring and Building the Kernel, a zImage compiled with the arm-unknown-linux-gnueabi toolchain and the device
tree binary for the Versatile PB. From this , you should have created initramfs , which includes BusyBox
compiled with the same toolchain. Now, you can launch QEMU using the script in MELP/_05/run-qemu-initramfs.sh or using this
command:
$
QEMU_AUDIO_DRV=none \
qemu-system-arm
-m 256M -nographic -M versatilepb -kernel zImage \
-append
"console=ttyAMA0 rdinit=/bin/sh" -dtb versatile-pb.dtb \
-initrd
initramfs.cpio.gz
You should get a root shell with the prompt / #.
Booting the BeagleBone
Black
For the BeagleBone Black,
we need the microSD card prepared in 4, Configuring
and Building the Kernel, plus a root filesystem built using the arm-cortex_a8-linux-gnueabihf toolchain. Copy uRamdisk you created earlier in this
section
to the
boot partition on the microSD card, and then use it to boot the BeagleBone
Black to point that you get a U-Boot prompt. Then enter these commands:
fatload
mmc 0:1 0x80200000 zImage
fatload mmc 0:1 0x80f00000 am335x-boneblack.dtb fatload mmc 0:1
0x81000000 uRamdisk
setenv bootargs console=ttyO0,115200 rdinit=/bin/sh bootz 0x80200000
0x81000000 0x80f00000
If all goes well, you will
get a root shell with the prompt / # on the serial console.
Mounting proc
You will find that on both
platforms the ps command doesn't work. This
is because the proc filesystem has not been
mounted yet. Try mounting it:
# mount
-t proc proc /proc
Now, run ps again, and you will see the process listing.
A refinement to
this setup would be to write a shell script that mounts proc, and anything else that
needs to be done at boot-up. Then, you could run this script instead of /bin/sh at boot. The following
snippet gives an idea of how it would work:
#!/bin/sh
/bin/mount
-t proc proc /proc
# Other boot-time commands go here
/bin/sh
The last line, /bin/sh, launches a new shell that
gives you an interactive root shell prompt. Using a shell as init in this way
is very handy for quick hacks, for example, when you want to rescue a system
with a broken init program. However, in most cases, you would use an init
program, which we will cover later on in this . But, before this, I want to
look at two other ways to load
initramfs.
Building an initramfs into the kernel image
So far, we have created a
compressed initramfs as a separate file and
used the bootloader to load it into memory. Some bootloaders do not have the
ability to load an initramfs file in this way. To cope with these situations,
Linux can be configured to incorporate initramfs into the kernel image. To do this, change the
kernel configuration and set CONFIG_INITRAMFS_SOURCE to the full path of the cpio
archive you created earlier. If you are using menuconfig, it is in General
setup | Initramfs source file(s).
Note that it has to be the uncompressed cpio file
ending in .cpio, not the gzipped version. Then, build the
kernel.
Booting is the same as
before, except that there is no ramdisk file. For QEMU, the command is like
this:
$
QEMU_AUDIO_DRV=none \
qemu-system-arm
-m 256M -nographic -M versatilepb -kernel zImage \
-append
"console=ttyAMA0 rdinit=/bin/sh" -dtb versatile-pb.dtb
For the BeagleBone Black, enter these commands at the U-Boot prompt:
fatload
mmc 0:1 0x80200000 zImage
fatload mmc 0:1 0x80f00000 am335x-boneblack.dtb setenv bootargs
console=ttyO0,115200 rdinit=/bin/sh bootz 0x80200000 – 0x80f00000
Of course, you must
remember to regenerate the cpio
file each time you change the contents of the root filesystem, and then rebuild
the kernel.
Building an initramfs using a device table
A device table is a text
file that lists the files, directories, device nodes, and links that go into an
archive or filesystem image. The overwhelming advantage is that it allows you
to create entries in the archive file that are owned by the root user, or any other UID,
without having root privileges yourself. You can even create device nodes
without needing root privileges. All this is possible because the archive is
just a data file. It is only when it is expanded by Linux at boot time that
real files and directories get created, using the attributes you have
specified.
The kernel has a feature
that allows us to use a device table when creating an initramfs. You write the device
table file, and then point CONFIG_INITRAMFS_SOURCE at it. Then, when you build the kernel, it creates
the cpio archive from the
instructions in the device table. At no point do you need root access.
Here is a device table for
our simple rootfs, but missing most of the
symbolic links to BusyBox to make it manageable:
dir /bin 775 0 0
dir /sys 775 0 0
dir /tmp 775 0 0
dir /dev 775 0 0
nod /dev/null 666 0 0 c 1 3
nod /dev/console 600 0 0 c 5 1
dir /home 775 0 0
dir /proc 775 0 0
dir /lib 775 0 0
slink /lib/libm.so.6 libm-2.22.so 777 0 0
slink /lib/libc.so.6 libc-2.22.so 777 0 0
slink /lib/ld-linux-armhf.so.3 ld-2.22.so 777 0
0
file /lib/libm-2.22.so
/home/chris/rootfs/lib/libm-2.22.so 755 0 0 file /lib/libc-2.22.so
/home/chris/rootfs/lib/libc-2.22.so 755 0 0 file /lib/ld-2.22.so
/home/chris/rootfs/lib/ld-2.22.so 755 0 0
The syntax is fairly obvious:
dir <name> <mode> <uid>
<gid>
file <name> <location> <mode>
<uid> <gid>
nod <name> <mode> <uid>
<gid> <dev_type> <maj> <min>
slink <name> <target> <mode>
<uid> <gid>
The commands dir,
nod, and slink create a file system
object in the initramfs
cpio archive
with the name, mode, user ID and group ID given. The file command copies the file
from the source location into the archive and sets the mode, the user ID, and
the group ID.
The task of creating an initramfs device table from scratch
is made easier by a script in the kernel source code in scripts/gen_initramfs_list.sh, which creates a device
table from a given directory. For example, to create the initramfs device table for directory
rootfs, and to change the
ownership of all files owned by user ID 1000 and group ID 1000 to user and group ID 0, you would use this
command:
$ bash linux-stable/scripts/gen_initramfs_list.sh -u 1000 -g 1000 \ rootfs
> initramfs-device-table
Note that the script only
works with a bash shell. If you have a
system with a different default shell, as is the case with most Ubuntu
configurations, you will find that the script fails. Hence, in the command
given previously, I explicitly used bash to run the script.
The old initrd format
There is an
older format for a Linux ramdisk, known as initrd. It was the only format available before Linux
2.6 and is still needed if you are using the mmu-less variant of Linux,
uClinux. It is pretty obscure and I will not cover it here. There is more
information in the kernel source in Documentation/initrd.txt.
The init program
Running a shell, or even a
shell script, at boot time is fine for simple cases, but really you need
something more flexible. Normally, Unix systems run a program called init that
starts up and monitors other programs. Over the years, there have been many
init programs, some of which I will describe in 9, Interfacing with Device
Drivers. For now, I will briefly introduce the init from BusyBox.
The init program begins by
reading the configuration file, /etc/inittab. Here is a simple example, which is adequate for our needs:
::sysinit:/etc/init.d/rcS
::askfirst:-/bin/ash
The first line runs a shell script, rcS, when init is
started. The second line prints
the message Please press Enter to
activate this console to the console and starts a shell when you press Enter. The leading -
before /bin/ash means that it will become
a login shell, which sources /etc/profile and $HOME/.profile before giving the shell
prompt. One of the advantages of launching the shell like this is that job
control is enabled. The most
immediate effect is that you can use Ctrl
+ C to terminate the current program.
Maybe you didn't notice it before but, wait until you run the ping program and find you can't
stop it!
BusyBox init provides a
default inittab if none is present in the
root filesystem. It is a little more extensive than the preceding one.
The script called /etc/init.d/rcS is the place to put
initialization commands that need to be performed at boot, for example,
mounting the proc and sysfs filesystems:
#!/bin/sh
mount -t proc proc /proc
mount -t sysfs sysfs /sys
Make sure that you make rcS executable like this:
$ cd
~/rootfs
$ chmod
+x etc/init.d/rcS
You can try it out on QEMU by changing the -append parameter like this:
-append
"console=ttyAMA0 rdinit=/sbin/init"
For the BeagleBone Black,
you need to set the bootargs variable in U-Boot as shown here:
setenv
bootargs console=ttyO0,115200 rdinit=/sbin/init
Starting a daemon process
Typically, you would want
to run certain background processes at startup. Let's take the log daemon, syslogd, as an example. The
purpose of syslogd is to accumulate log
messages from other programs, mostly other daemons. Naturally, BusyBox has an
applet for that!
Starting the daemon is as simple as adding a line like this to etc/inittab:
::respawn:/sbin/syslogd
-n
respawn means that if the program
terminates, it will be automatically restarted; -n means that it should run as a foreground
process. The log is written to
/var/log/messages.
You may
also want to start klogd in the same way: klogd sends kernel log messages to syslogd so that they can be logged to permanent storage.

Configuring user accounts
As I have hinted already,
it is not good practice to run all programs as root, since if one is
compromised by an outside attack, then the whole system is at risk. It is
preferable to create unprivileged user accounts and use them where full root is
not necessary.
User names are configured
in /etc/passwd. There is one line per
user, with seven fields of information separated by colons, which are in order:
The login name
A hash code used to verify
the password, or more usually an x to indicate that the password is stored in /etc/shadow The user ID
The group ID
A comment field, often left blank
The user's home directory
(Optional) the shell this user will use
Here is a simple example in
which we have user root with UID 0, and user daemon with UID 1:
root:x:0:0:root:/root:/bin/sh
daemon:x:1:1:daemon:/usr/sbin:/bin/false
Setting the shell for user daemon to /bin/false ensures that any attempt
to log on with that name will fail.
Various programs have to
read /etc/passwd in order to look up user
names and UIDs, and so the file has to be world readable. This is a problem if
the password hashes are stored in there as well, because a malicious program
would be able to take a copy and discover the actual passwords using a variety
of cracker programs. Therefore, to reduce the exposure of this sensitive
information, the passwords are stored in /etc/shadow and x is placed in the password field to indicate
that this is the case. The file called /etc/shadow only needs to be accessed by root, so as long as the root user is not compromised,
the passwords are safe.
The shadow password file
consists of one entry per user, made up of nine fields. Here is an example that
mirrors the password file shown in the preceding paragraph:
root::10933:0:99999:7:::
daemon:*:10933:0:99999:7:::
The first two fields are
the username and the password hash. The remaining seven fields are related to
password aging, which is not usually an issue on embedded devices. If you are
curious about the full details, refer to the manual page for shadow(5).
In the example, the
password for root is empty, meaning that
root can log on without giving a password. Having an empty password for root is
useful during development but not for production. You can generate or change a
password hash by running the passwd
command on the target, which will write a new hash to /etc/shadow. If you want all
subsequent root filesystems to have this same password, you could copy this
file back to the staging directory.
Group names are stored in a
similar way in /etc/group. There is one line per
group consisting of four fields separated by colons. The fields are here:
The name of the group
The group password, usually
an x character, indicating that
there is no group password
The GID or group ID
An optional list of users who belong to this
group, separated by commas
Here is an example:
root:x:0:
daemon:x:1:
Adding user accounts to the root filesystem
Firstly, you have to add to
your staging directory the files etc/passwd, etc/shadow, and etc/group, as shown in the preceding section. Make sure
that the permissions of shadow are 0600. Next, you need to initiate the login procedure
by starting a program called getty.
There is a version of getty
in BusyBox. You launch it from inittab using
the keyword
respawn, which restarts getty when a login shell is terminated, so inittab should read like this:
::sysinit:/etc/init.d/rcS
::respawn:/sbin/getty 115200 console
Then, rebuild the ramdisk
and try it out using QEMU or the BeagleBone Black as before.
A better way of managing device nodes
Creating device nodes statically with mknod is quite hard
work and inflexible.
There are other ways to create device nodes automatically on demand:
devtmpfs: This is a pseudo
filesystem that you mount over /dev at
boot time.
The kernel
populates it with device nodes for all the devices that the kernel currently
knows about, and it creates nodes for new devices as they are detected at
runtime. The nodes are owned by root
and have default permissions of 0600.
Some well-known device nodes, such as /dev/null and /dev/random, override the default to 0666. To see exactly how this
is done, take
a look at
the Linux source file: drivers/char/mem.c and see how struct memdev is initialized.
mdev: This is a BusyBox applet
that is used to populate a directory with device nodes and to create new nodes as needed.
There is a configuration file, /etc/mdev.conf, which contains rules for ownership and the mode of the nodes.
udev: This is the mainstream
equivalent of mdev. You will find it on desktop Linux and in some embedded devices. It is very
flexible and a good choice for higher end embedded devices. It is now part of systemd.
Although both mdev and udev create the device nodes themselves, it is more usual to let devtmpfs do the job and use mdev/udev as a layer on top to
implement the policy for setting ownership and permissions.

An example using devtmpfs
Support for the devtmpfs filesystem is controlled
by kernel configuration variable: CONFIG_DEVTMPFS. It is not enabled in the default configuration
of the ARM Versatile PB,
so if you want to try out the following using this target, you will have to go
back and enable this option. Trying out devtmpfs is as simple as entering this command:
# mount
-t devtmpfs devtmpfs /dev
You will notice that afterward,
there are many more device nodes in /dev. For a permanent fix, add this to /etc/init.d/rcS:
#!/bin/sh
mount -t proc proc /proc
mount -t sysfs sysfs /sys
mount -t
devtmpfs devtmpfs /dev
If you enable CONFIG_DEVTMPFS_MOUNT in your kernel configuration,
the kernel will automatically mount devtmpfs just after mounting the root filesystem.
However, this option has no effect when booting initramfs, as we are doing here.
An example using mdev
While mdev is a bit more complex to
set up, it does allow you to modify the permissions of device nodes as they are
created. You begin by running mdev
with the -s option, which causes it to
scan the /sys directory looking for
information about current devices. From this information, it populates the /dev directory with the
corresponding nodes. If you want to keep track of new devices coming online and
create nodes for them as well, you need to make mdev a hot plug client by writing to /proc/sys/kernel/hotplug. These additions to /etc/init.d/rcS will
achieve all of this:
#!/bin/sh
mount -t proc proc /proc
mount -t sysfs sysfs /sys
mount -t
devtmpfs devtmpfs /dev
echo
/sbin/mdev > /proc/sys/kernel/hotplug
mdev -s
The default
mode is 660 and the ownership is root:root. You can change this by
adding rules in /etc/mdev.conf. For example, to give the null, random, and urandom devices their correct
modes, you would add this to /etc/mdev.conf:
null root:root 666
random root:root 444
urandom root:root 444
The format is documented in
the BusyBox source code in docs/mdev.txt, and there are more examples in the directory named examples.
Are static device nodes so bad after all?
Statically created device
nodes do have one advantage over running a device manager: they don't take any
time during boot to create. If minimizing boot time is a priority, using
statically-created device nodes will save a measurable amount of time.
Configuring the network
Next, let's look at some
basic network configurations so that we can communicate with the outside world.
I am assuming that there is an Ethernet interface, eth0, and that we only need a
simple IPv4 configuration.
These examples use the
network utilities that are part of BusyBox, and they are sufficient for a
simple use case, using the old-but-reliable ifup and ifdown programs. You can read the manual pages for
both to get the details. The main network configuration is stored in /etc/network/interfaces. You will need to create
these directories in the staging directory:
etc/network
etc/network/if-pre-up.d
etc/network/if-up.d
var/run
For a static IP address, /etc/network/interfaces would look like this:
auto lo
iface lo inet loopback
auto eth0
iface eth0 inet static
address 192.168.1.101
netmask 255.255.255.0
network 192.168.1.0
For a dynamic IP address
allocated using DHCP, /etc/network/interfaces would look like this:
auto lo
iface lo inet loopback
auto eth0
iface eth0 inet dhcp
You will also have to
configure a DHCP client program. BusyBox has one named udchpcd. It needs a shell script that
should go in /usr/share/udhcpc/default.script. There is a suitable
default in the BusyBox source code
in the directory examples/udhcp/simple.script.
Network components for
glibc
glibc uses a mechanism known as
the name service switch (NSS) to control the way that names are resolved
to numbers for networking and users. Usernames, for example, maybe resolved to
UIDs via the file /etc/passwd, and network services such
as HTTP can be resolved to the service port number via /etc/services. All this is configured by /etc/nsswitch.conf; see the manual page, nss(5),
for full details. Here is a simple example that will suffice for most embedded Linux implementations:
passwd: files
group: files
shadow: files
hosts: files dns
networks: files
protocols: files
services: files
Everything is resolved by
the correspondingly named file in /etc, except for the host names, which may
additionally be resolved by a DNS lookup.
To make this work, you need
to populate /etc with those files.
Networks, protocols, and services are the same across all Linux systems, so
they can be copied from /etc
in your development PC. /etc/hosts
should, at least, contain the loopback address:
127.0.0.1 localhost
The other files, passwd, group, and shadow, have been described earlier
in the section Configuring user accounts.
The last piece of the
jigsaw is the libraries that perform the name resolution. They are plugins that
are loaded as needed based on the contents of nsswitch.conf, meaning that they do not show up as dependencies
if you use readelf or ldd. You will simply have to
copy them from the toolchain's sysroot:
$ cd
~/rootfs
$ cp -a
$SYSROOT/lib/libnss* lib
$ cp -a
$SYSROOT/lib/libresolv* lib
Creating filesystem images with device tables
We saw earlier in the section
Creating a boot initramfs that the
kernel has an option to create initramfs
using a device table. Device tables are really useful because they allow a
non-root user to create device nodes and to allocate arbitrary UID and GID
values to any file or directory. The same concept has been applied to tools
that create other filesystem image formats, as shown in this table:
|
Filesystem
format
|
Tool
|
|
|
|
|
jffs2
|
mkfs.jffs2
|
|
|
|
|
ubifs
|
mkfs.ubifs
|
|
|
|
|
ext2
|
genext2fs
|
|
|
|
We will look at jffs2 and ubifs in 7, Creating
a Storage Strategy, when we look at filesystems for flash memory. The
third, ext2, is a format commonly used
for managed flash memory, including SD cards. The example that follows uses ext2 to create a disk image that
can be copied to an SD card.
They each take a device
table file with the format <name> <type> <mode> <uid> <gid> <major> <minor>
<start> <inc> <count>, where the meanings of the fields is as
follows:
name:
type: One of the following:
f: A regular file
d: A directory
c: A character special device file
b: A block special device file
uid The UID of the file
gid: The GID of the file
major and minor: The device numbers (device nodes only)
start, inc, and count: Allow you to create a
group of device nodes starting from
the minor number in start (device nodes only)
You do not have to specify every file, as you do
with the kernel initramfs table. You just have to
point at a directory—the staging directory—and list the changes and exceptions
you need to make in the final filesystem image.
A simple example which populates static device nodes for us is as
follows:
/dev d 755 0 0 - - - - -
/dev/null c 666 0 0 1 3 0 0 -
/dev/console c 600 0 0 5 1 0 0 -
/dev/ttyO0 c 600 0 0 252 0 0 0 -
Then, you can use genext2fs to generate a filesystem
image of 4 MB (that is 4,096 blocks of the default size, 1,024 bytes):
$
genext2fs -b 4096 -d rootfs -D device-table.txt -U rootfs.ext2
Now, you can copy the
resulting image, rootfs.ext2, to an SD card or similar,
which we will do next.
Booting the BeagleBone
Black
The script called MELP/format-sdcard.sh creates two partitions on
the micro SD card: one for the boot files and one for the root filesystem.
Assuming that you have created the root filesystem image as shown in the
previous section, you can use the dd command to write it to the second partition. As
always, when copying files directly to storage devices like this, make
absolutely sure that you know which is the micro SD card. In this case, I am
using a built-in card reader, which is the device called /dev/mmcblk0, so the command is as
follows:
$ sudo
dd if=rootfs.ext2 of=/dev/mmcblk0p2
Then, slot the micro SD
card into the BeagleBone Black, and set the kernel command line to root=/dev/mmcblk0p2. The complete sequence of
U-Boot commands is as follows:
fatload
mmc 0:1 0x80200000 zImage
fatload
mmc 0:1 0x80f00000 am335x-boneblack.dtb
setenv bootargs console=ttyO0,115200 root=/dev/mmcblk0p2 bootz
0x80200000 – 0x80f00000
This is an
example of mounting a filesystem from a normal block device, such as an SD
card. The same principles apply to other filesystem types and we will look at
them in more detail in 7, Creating a Storage Strategy.
Mounting the root filesystem using NFS
If your device has a
network interface, it is often useful to mount the root filesystem over the
network during development. It gives you access to the almost unlimited storage
on your host machine, so you can add in debug tools and executables with large
symbol tables. As an added bonus, updates made to the root filesystem on the
development machine are made available on the target immediately. You can also
access all the target's log files from the host.
To begin with, you need to
install and configure an NFS server on your host. On Ubuntu, the package to
install is named nfs-kernel-server:
$ sudo
apt-get install nfs-kernel-server
The NFS server needs to be
told which directories are being exported to the network, which is controlled
by /etc/exports. There is one line for
each export. The format is described in the manual page exports(5). As an example, to export the root filesystem on my
host, I have this:
/home/chris/rootfs
*(rw,sync,no_subtree_check,no_root_squash)
* exports the directory to
any address on my local network. If you wish, you can give a single IP address
or a range at this point. There follows a list of options enclosed in
parentheses. There must not be any spaces between * and the opening parenthesis.
The options are here:
rw: This exports the directory as read-write.
sync: This option selects the synchronous version of the NFS protocol,
which is more robust but a little slower than
the async option.
no_subtree_check: This option disables subtree checking, which has mild
security implications, but can improve
reliability in some circumstances.
no_root_squash: This option allows requests from user ID 0 to be processed
without squashing
to a different user ID. It is necessary to allow the target
to access correctly the files owned by root.
Now, you need to set up the
target to mount the root filesystem over NFS. For this to work, your kernel has
to be configured with CONFIG_ROOT_NFS. Then, you can configure Linux to do the mount at boot time by adding
the following to the kernel command line:
root=/dev/nfs rw
nfsroot=<host-ip>:<root-dir> ip=<target-ip>
The options are as follows:
rw: This mounts the root filesystem read-write.
nfsroot: This specifies the IP
address of the host, followed by the path to the exported root filesystem.
ip: This is the IP address to
be assigned to the target. Usually, network addresses are assigned at runtime, as we have
seen in the section Configuring the
network. However, in this case, the interface has to be configured before the root filesystem is mounted and init has been
started. Hence it is configured on the kernel command line.
There is
more information about NFS root mounts in the kernel
source
in Documentation/filesystems/nfs/nfsroot.txt.
Testing with QEMU
The following script
creates a virtual network between the network device called tap0 on the host and eth0 on the target using a pair
of static IPv4 addresses, and then
launches QEMU with the parameters to use tap0 as the emulated interface.
You will need
to change the path to the root filesystem to be the full path to your staging
directory and maybe the IP addresses if they conflict with your network
configuration:
#!/bin/bash
KERNEL=zImage
DTB=versatile-pb.dtb
ROOTDIR=/home/chris/rootfs
HOST_IP=192.168.1.1
TARGET_IP=192.168.1.101
NET_NUMBER=192.168.1.0
NET_MASK=255.255.255.0
sudo tunctl -u $(whoami) -t tap0
sudo ifconfig tap0 ${HOST_IP}
sudo route add -net
${NET_NUMBER} netmask ${NET_MASK} dev tap0 sudo sh -c "echo 1 >
/proc/sys/net/ipv4/ip_forward"
QEMU_AUDIO_DRV=none
qemu-system-arm -m 256M -nographic -M
versatilepb -kernel ${KERNEL} -append "console=tt
The
script is available in MELP/_05/run-qemu-nfsroot.sh.
It should boot up as
before, now using the staging directory directly via the NFS export. Any files
that you create in that directory will be immediately visible to the target
device, and any files created in the device will be visible to the development
PC.
Testing with the BeagleBone
Black
In a similar way, you can enter these commands at the U-Boot prompt of
the
BeagleBone Black:
setenv serverip 192.168.1.1
setenv ipaddr 192.168.1.101
setenv npath [path to staging directory]
setenv bootargs
console=ttyO0,115200 root=/dev/nfs rw nfsroot=${serverip}:${npath} ip=$ fatload
mmc 0:1 0x80200000 zImage
fatload mmc 0:1 0x80f00000
am335x-boneblack.dtb bootz 0x80200000 - 0x80f00000
There is a U-Boot
environment file in _05/uEnv.txt, which contains all these commands. Just copy it to the boot partition
of the microSD card and U-Boot will do the rest.
Problems with file
permissions
The files that you copied
into the staging directory will be owned by the UID of the user you are logged
on as, typically 1000. However, the target has
no knowledge of this user. What is more, any files created by the target will
be owned by users configured by the target, often the root user. The whole thing is a
mess. Unfortunately, there is no simple way out. The best solution is to make a
copy of the staging directory and change ownership to UID and GID to 0, using the command sudo chown -R 0:0 *. Then, export this
directory as the NFS mount. It removes the convenience of having just one copy
of the root filesystem shared between development and target systems, but, at
least, the file ownership will be correct.
Using TFTP to load the
kernel
Now that we know how to
mount the root filesystem over a network using NFS, you may be wondering if
there is a way to load the kernel, device tree, and initramfs over the network as well.
If we could do this, the only component that needs to be written to storage on the target is
the bootloader. Everything else could be loaded from the host machine. It would
save time since you would not need to keep reflashing the target, and you could
even get work done while the flash storage drivers are still being developed
(it happens).
The Trivial File Transfer Protocol (TFTP) is the answer to the problem. TFTP is a very simple file
transfer protocol, designed to be easy to implement in bootloaders such as
U-Boot.
But, firstly, you need to
install a TFTP daemon on your development machine. On Ubuntu, you could install
the tftpd-hpa package, which, by default,
grants read-only access to files in the directory /var/lib/tftpboot. With tftpd-hpa installed and running,
copy the files that you want to copy to the target into /var/lib/tftpboot, which, for the BeagleBone
Black, would be
zImage and am335x-boneblack.dtb. Then enter these commands
at the U-Boot Command Prompt:
setenv serverip 192.168.1.1
setenv ipaddr 192.168.1.101
tftpboot 0x80200000 zImage
tftpboot 0x80f00000 am335x-boneblack.dtb
setenv npath [path to staging]
setenv bootargs
console=ttyO0,115200 root=/dev/nfs rw nfsroot=${serverip}:${npath} ip=$ bootz
0x80200000 - 0x80f00000
You may find that the tftpboot command hangs, endlessly
printing out the letter T,
which means that the TFTP requests are timing out. There are a number of
reasons why this happens, the most common ones being:
There is an incorrect IP address for serverip.
The TFTP daemon is not running on the server.
There is a firewall on the
server which is blocking the TFTP protocol. Most firewalls do indeed block the
TFTP port, 69, by default.
Once you have resolved the
problem, U-Boot can load the files from the host machine and boot in the usual
way. You can automate the process by putting the commands into a uEnv.txt file.
TLDR;
One of the strengths of
Linux is that it can support a wide range of root filesystems, and so it can be
tailored to suit a wide range of needs. We have seen that it is possible to
construct a simple root filesystem manually with a small number of components
and that BusyBox is especially useful in this regard. By going through the
process one step at a time, it has given us insight into some of the basic
workings of Linux systems, including network configuration and user accounts.
However, the task rapidly becomes unmanageable as devices get more complex.
And, there is the ever-present worry that there may be a security hole in the
implementation, which we have not noticed.
In the next , I will show
you how using an embedded build system can make the process of creating an
embedded Linux system much easier and more reliable. I will start by looking at
Buildroot, and then go onto look at the more complex, but powerful, Yocto
Project.
Comments
Post a Comment